Colorpixnu Pixel Art Color by Number How Do U Save
Working with Images
Computers piece of work with files and as a painting program, Krita works with images equally the type of file it creates and manipulates.
What do Images Incorporate?
If you accept a text certificate, it of course contains messages, strung in the right order, so the reckoner loads them as coherent sentences.
Raster Data
This is the main data on the paint layers you make. And then these are the strokes with the paint castor and look pixelated upward close. A multi-layer file will contain several of such layers, that go overlaid on top of each other so make the terminal image.
A single layer file will unremarkably just contain raster data.
Vector Data
These are mathematical operations that tell the computer to draw pixels on a spot. This makes them much more than scalable, because y'all just tell the operation to make the coordinates four times bigger to calibration information technology up. Due to this vector data is much more editable, lighter, but at the aforementioned time it'due south also much more than CPU intensive.
Performance Data
Stuff like the filter layers, that tells Krita to change the colors of a layer, simply also transparency masks, grouping layer and transformation masks are saved to multi-layer files. Existence able to load these depend on the software that initially made the file. So Krita can load and save groups, transparency masks and layer effects from PSD, but non load or salve transform masks.
Metadata
Metadata is information like the cosmos date, writer, clarification and besides information similar DPI.
Image size
The image size is the dimension and resolution of the canvas. Paradigm size has direct upshot file size of the Krita certificate. The more pixels that need to be remembered and the higher the bit depth of the color, the heavier the resulting file volition exist.
DPI/PPI
DPI stands for Dots per Inch, PPI stands for Pixels per Inch. In printing industry, suppose if your printer prints at 300 DPI . Information technology means it is actually putting 300 dots of colors in an area equal to an Inch. This means the number of pixels your artwork has in a relative area of an inch.
DPI is the concern of the printer, and artists while creating artwork should continue PPI in mind. According to the PPI you have set, the printers can determine how large your image should be on a piece of paper.
Some standards:
- 72 PPI
-
This is the default PPI of monitors as causeless by all programs. It is non fully right, equally most monitors these days accept 125 PPI or even 300 PPI for the retina devices. Nonetheless, when making an paradigm for computer consumption, this is the default.
- 120 PPI
-
This is often used every bit a standard for low-quality posters.
- 300 PPI
-
This is the minimum you should apply for quality prints.
- 600 PPI
-
The quality used for line art for comics.
Color depth
Nosotros went over color depth in the Color Management page. What you need to sympathize is that Krita has image color spaces, and layer color spaces, the latter which can save retentivity if used right. For case, having a line fine art layer in grayscale can one-half the memory costs.
Image color space vs layer colour space vs conversion.
Because there's a difference betwixt prototype color space and layer color space, you tin change only the image colour infinite in which volition leave the layers alone. But if y'all want to change the color space of the file including all the layers you can do it past going to this will convert all the layers color space as well.
Author and Description
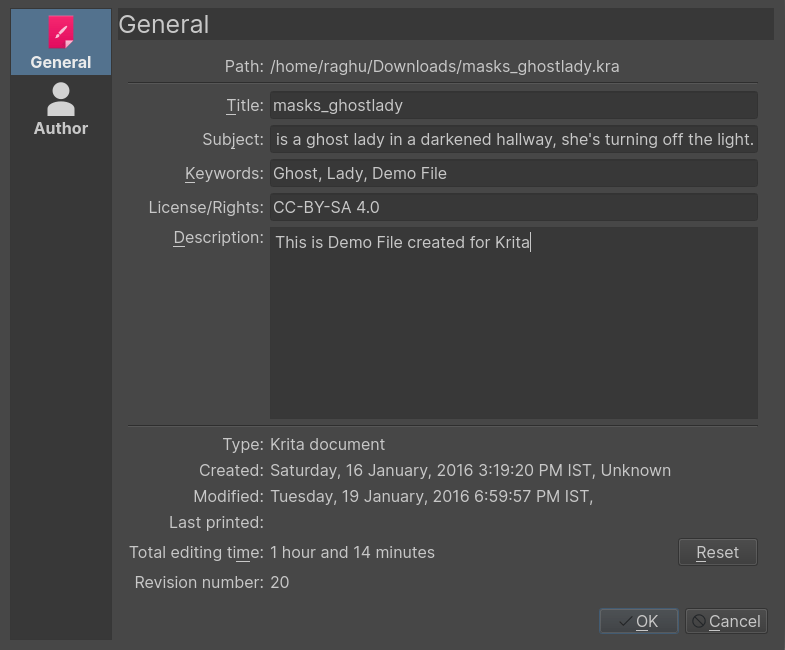
Krita will automatically relieve who created the paradigm into your paradigm'southward metadata. Forth with the other data such as fourth dimension and engagement of creation and modification, Krita as well shows editing time of a document in the certificate information dialog, useful for professional illustrators, speed-painters to go along track of the time they worked on artwork for billing purposes. Information technology detects when you haven't performed deportment for a while, and has a precision of ±lx seconds. Yous tin can empty it in the document info dialog and of course by unzipping you .kra file and editing the metadata at that place.
These things can be edited in , and for the author's data . Profiles tin can exist switched nether .
Setting the canvas background color
You can fix the canvas background colour via carte du jour item. This allows you to turn the background color non-transparent and to change the color. This is also useful for certain file formats which force a background colour instead of transparency. PNG and JPG export use this color as the default color to fill in transparency if you exercise not desire to export transparency.
If you come up in from a program similar Paint Tool SAI, and then using this option, or using As canvas color radio button at Background: section in the new file options, volition allow you to work in a slightly more than comfortable surroundings, where transparency isn't depicted with checkered boxes.
Bones transforms
In that location are some bones transforms available in the Paradigm menu.
- Shear Image…
-
This volition let you to skew the whole paradigm and its layers.
- Rotate
-
This testify a submenu that will allow you to rotate the image and all its layers quickly.
- Mirror Epitome Horizontally/Vertically
-
This will allow you to mirror the whole paradigm with all its layers.
But there are more options than that…
Cropping and resizing the canvas
Yous tin crop and image with the Ingather Tool, to cut away extra space and better the composition.
Trimming
Using , Krita resizes the image to the dimensions of the layer selected. Useful for when you paste a too large paradigm into the layer and desire to resize the canvas to the extent of this layer.
is a faster cousin to the ingather tool. This helps us to resize the canvas to the dimension of any active selection. This is specially useful with right-clicking the layer on the layer stack and choosing Select Opaque. will and so crop the canvass to the selection bounding box.
is actually for layers, and will trim all layers to the size of the image, making your files lighter by getting rid of invisible information.
Resizing the sail
You can as well resize the canvas via (or the Ctrl + Alt + C shortcut). The dialog box is shown below.
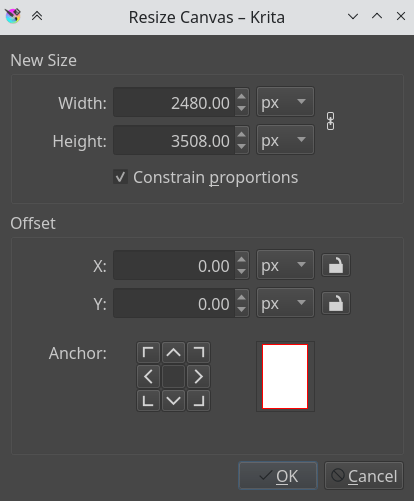
In this, Constrain proportions checkbox will brand sure the acme and width stay in proportion to each other equally you change them. Offset indicates where the new canvas infinite is added around the current image. You lot basically make up one's mind where the current image goes (if you press the left-push button, it'll become to the center left, and the new canvas infinite volition exist added to the right of the image).
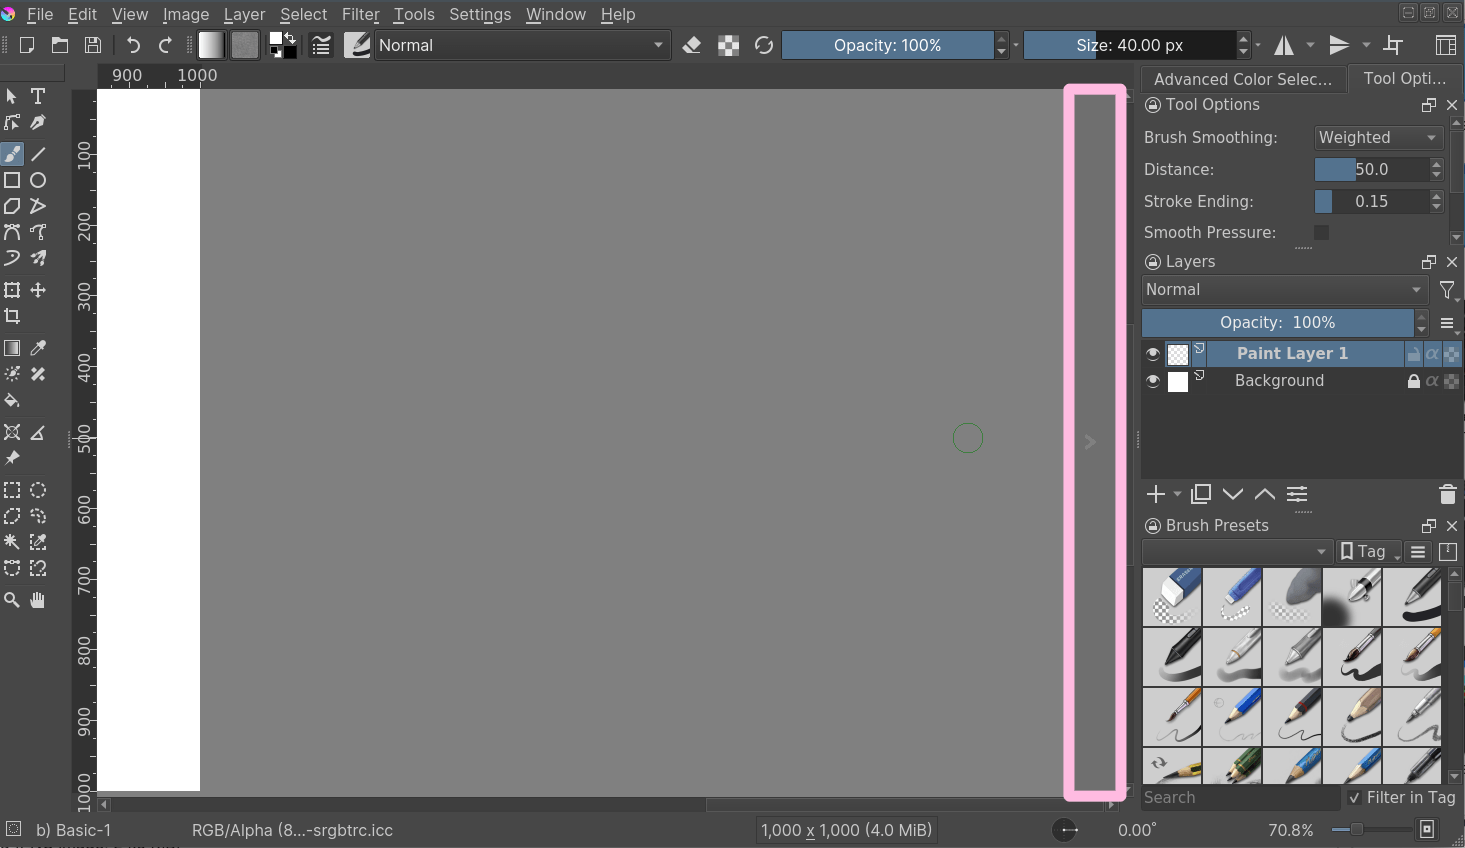
Another way to resize the canvas according to the need while drawing is when y'all scroll abroad from the end of the canvas, y'all can see a strip with an pointer appear. Clicking this will extend the canvas in that direction. You can see the pointer marked in cherry in the example below:
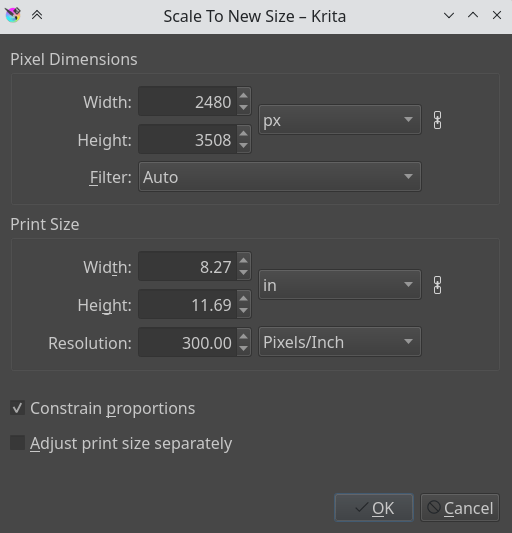
Resizing the image
Scale Image to New Size… allows you to resize the whole image. Also, importantly, this is where you tin can change the resolution or upres your image. So for instance, if you were initially working at 72 PPI to block in large shapes and colors, images, etc… And now you want to really get in and do some detail piece of work at 300 or 400 PPI this is where you would make the modify.
Similar all other dialogs where a concatenation link appears, when the chain is linked the attribute ratio is maintained. To disconnect the chain, simply click on the link and the two halves will split up.
Separating Images
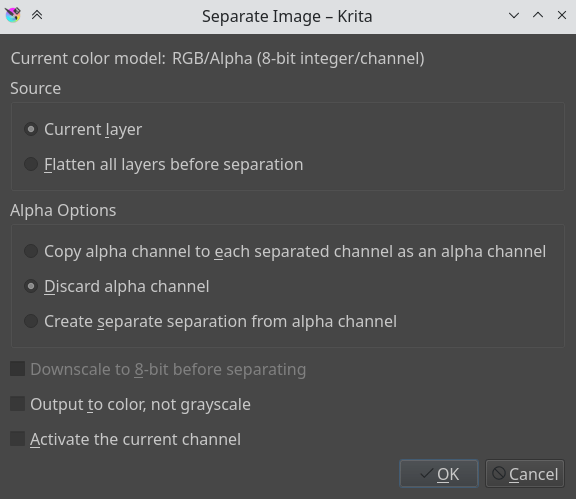
This powerful image manipulation feature lets you separate an image into its different components or channels.
This is useful for people working in print, or people manipulating game textures. There's no combine functionality, just what you lot tin can do, if using colored output, is to set two of the channels to the improver Blending Modes.
For grayscale images in the RGB space, you tin employ the Copy Red, Copy Green and Copy Bluish blending modes, with using the cherry-red one for the red channel image, etc.
Saving, Exporting and Opening Files
When Krita creates or opens a file, it has a copy of the file in memory, that it edits. This is role of the mode how computers piece of work: They make a copy of their file in the RAM. Thus, when saving, Krita takes its re-create and copies information technology over the existing file. There's a couple of tricks you can practise with saving.
- Save
-
Krita saves the current image in its retentiveness to a defined place on the hard-drive. If the image hadn't been saved before, Krita will enquire you where to save it.
- Salve As…
-
Make a re-create of your current file by saving it with a different proper noun. Krita will switch to the newly made file as its active document.
- Open…
-
Open a saved file. Fairly straightforward.
- Export…
-
Save a file to a new location without actively opening it. Useful for when you lot are working on a layered file, but only need to salvage a flattened version of it to a certain location.
- Open up Existing Document equally Untitled Document…
-
This is a scrap of an odd ane, merely it opens a file, and forgets where yous saved it to, so that when pressing 'save' it asks you where to save information technology. This is also called 'import' in other programs.
- Create Copy from Current Image
-
Makes a new copy of the current paradigm. Similar to , simply then with already opened files.
- Save Incremental Version
-
Saves the current prototype as
filename_XXX.kraand switches the current certificate to it. - Save Incremental Backup
-
Copies and renames the last saved version of your file to a backup file and saves your document under the original proper name.
Notation
Since Krita'south file format is compressed data file, in case of a decadent or cleaved file you tin can open up information technology with archive managers and extract the contents of the layers. This will help you to recover equally much equally possible information from the file. On Windows, you will need to rename it to filename.zip to open it.
constablelesellizen66.blogspot.com
Source: https://docs.krita.org/en/user_manual/working_with_images.html
0 Response to "Colorpixnu Pixel Art Color by Number How Do U Save"
Post a Comment